Session
- Joe Kanaan (Unlicensed)
- Michel El Hajj (Unlicensed)
Objective
SOAJS provides you the option of using a session with your services. The session gives you the ability to save data in the session and retrieve it from the microservice itself, or any other microservice with the same session.
This space will show you:
Warning
Please make sure you have installed the SOAJS Dashboard before continuing!
Turn on Session
As mentioned before, the session works alongside the microservice, so let's set up a simple microservice.
Note
Remember that a service is composed, at least, of a config.js and index.js file. Click here to remember how to build a service.
'use strict';

module.exports = {
   "serviceVersion": 1,
   "serviceName": "hellosession",
   "serviceGroup": "SOAJS Session Example",
   "servicePort": 4120,
   "requestTimeout": 30,
   "requestTimeoutRenewal": 5,
   "extKeyRequired": true,
   "session": true,
   "errors": {
      "400": "please provide a firstName"
   },
   "schema": {
      "/set": {
         "_apiInfo": {
            "l": "set name"
         },
         "firstName": {
            "source": ["body.firstName"],
            "required": true,
            "validation": {
               "type": "string"
            }
         }
      },
      "/get": {
         "_apiInfo": {
            "l": "get name"
         }
      }
   }
};
Before moving on to the index.js file, it will us well to understand how the SOAJS session functions.
It is not enough to set session to true in the config.js file, the SOAJS session is key driven, meaning we also have to set extKeyRequired to true.
Setting extKeyRequired to true ties out service to a tenant, meaning that the APIs will require a key in order for a request to be successful.
Using the Manage pillar in the Dashboard, create a tenant and use its key in your tests.
'use strict';
var soajs = require('soajs');
var config = require('./config.js');

var service = new soajs.server.service(config);

service.init(function() {
   service.post("/set", function(req, res) {
      req.soajs.session.setSERVICE({"name": req.soajs.inputmaskData.firstName}, function() {
         res.json(req.soajs.buildResponse(null, true));
      });
   });
   service.get("/get", function(req, res) {
      var name = req.soajs.session.getSERVICE().name;
      res.json(req.soajs.buildResponse(null, "Hello " + name));
   });

   service.start();
});
Add data to Session
To add a data object to the Session, SOAJS provides a function: req.soajs.session.setSERVICE
The setSERVICE function takes 2 arguments:
- a data object containing the data you want to store in the session
- a callback
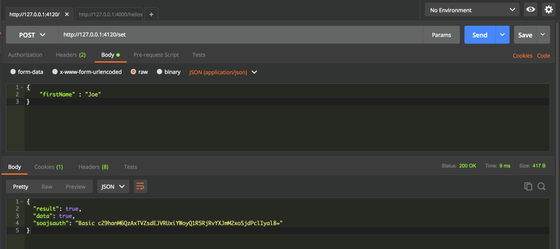
Let's have a look at our /set API:
req.soajs.session.setSERVICE({"name": req.soajs.inputmaskData.firstName}, function() {
   res.json(req.soajs.buildResponse(null, true));
});
We are using req.soajs.inputmaskData to retireve the "firstName" we supplied through the body of the post request, and we are creating and object and passing it to setService.
Get data from Session
To get a data object from the Session, SOAJS provides a function: req.soajs.session.getSERVICE
The getSERVICE function takes no arguments.
Let's have a look at out /get API:
var name = req.soajs.session.getSERVICE().name;
res.json(req.soajs.buildResponse(null, "Hello " + name));
We are using the getSERVICE function to retrieve the value of the key from the object that we had passed to the setSERVICE function.
After that, we return the result through the SOAJS response.
Testing the service APIs
Now that everything is set up, we can go ahead and test our service.
Let's turn our service on:
# Go to the directory where you created your config.js and index.js files
cd /opt/soajs/node_modules/session.example


# Run the service
node .
The service is now running and listening for requests.
Using a terminal window, Postman, Insomnia, etc... we can test our service.
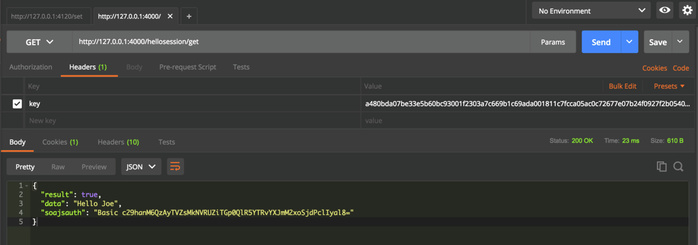
Note
Make sure that the key in the header of your requests is the key that you created and not the one form the screenshot!